
Introduction to Apple Wallet and Apple Card
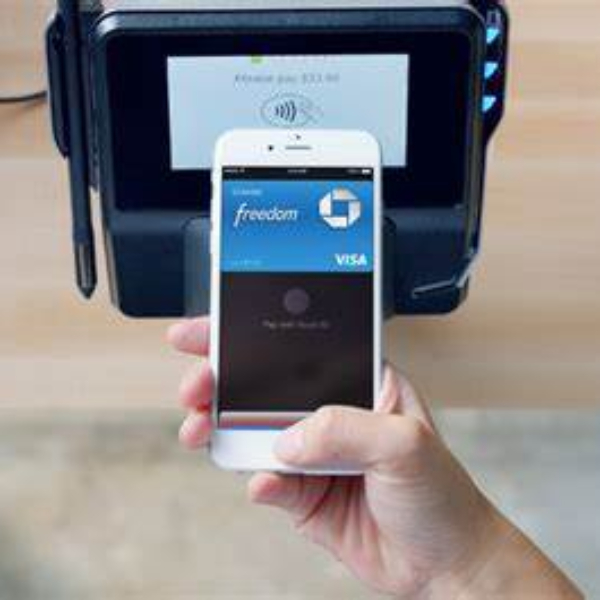
Apple Wallet serves as a digital purse on your iPhone. It safely stores your payment cards. Your Apple Card is one of these cards. It gives you a seamless way to pay. You can easily manage your card in the Apple Wallet app.
With Apple Wallet, keep cards handy without physical carry. Add cards with a few taps. The Apple Card offers rewards, like daily cash back. It integrates well with the iPhone, making transactions secure and private.
To manage cards, access them through the Apple Wallet. For changes like updating or removing a card, the process is simple. Understanding how to remove your Apple Card is important. You may want to do this for security reasons or to tidy up your wallet. If you’re looking to organize your finances, managing your cards in the Apple Wallet is essential, much like ensuring that your Armani Exchange wallet is tidy and secure by regularly updating or removing unnecessary cards.
Initial Steps to Access Apple Wallet
To begin removing your Apple Card from your wallet, first access the Apple Wallet app. Start on your iPhone’s home screen. Look for the Wallet app icon and tap to open it. If you can’t find it, swipe down on the home screen. Then, type “Wallet” in the search bar and select the app when it appears.
In the Wallet app, you’ll see all your cards displayed. They’re the credit, debit, and store cards you’ve added. Your Apple Card is among these. It’s likely at the front if you use it often. If not, swipe through your cards to locate it.
Before you proceed with removing the Apple Card, ensure you’re signed in. If not, your iPhone will prompt you to enter your Apple ID or use Touch ID or Face ID. This step is crucial. It keeps your financial information safe and private. Before removing your Apple Card, make sure your device is secure, as this is essential for protecting your financial data. Consider using an Ettinger wallet for an added layer of security, ensuring your cards and personal information remain safe while you’re on the go.
Next, get ready to manage your cards. With just a few more taps, you can remove your Apple Card from Apple Wallet. We’ll guide you through this process in the following sections of this blog.
Locating the Apple Card within the Wallet App
Once you open the Apple Wallet app, you’ll need to find your Apple Card. It may not be immediately visible. Here’s how to locate it:
- Look at the stack of cards on your screen. Swipe left or right to browse them.
- Your Apple Card typically appears at the front if you use it often.
- If it’s not at the front, keep swiping until you see the familiar Apple Card design.
- Tap on the Apple Card to select it. This action will bring it into full view.
It’s essential to know that your Apple Wallet can hold several cards. As you swipe, you may see other bank cards, loyalty cards, or even boarding passes. Take care not to confuse these with your Apple Card. The Apple Card has a distinct titanium look and the Apple logo. Once you’ve located it, you can move on to the next step. That is removing your Apple Card from the wallet, which we will cover in the next section.
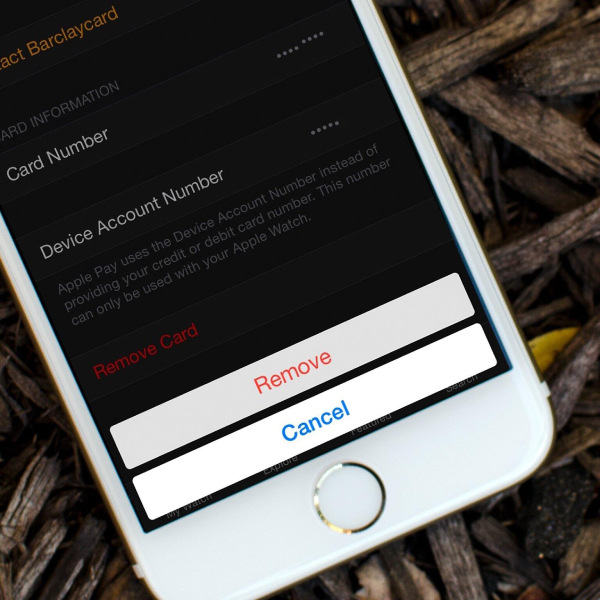
Removing the Apple Card from Your Wallet
To remove your Apple Card from the Apple Wallet, follow these simple steps:
- With the Wallet app open, select your Apple Card.
- Tap on the more button (…), usually at the top right.
- Scroll down to find the remove card option.
- Tap on ‘Remove Card’ to initiate the process.
- Confirm removal when prompted to do so.
This process will delete your Apple Card from your Apple Wallet. Remember, this action is irreversible. Once you remove the card, all associated transactions and rewards on the iPhone will also be removed. Should you want to use your Apple Card again, you will need to add it back to the wallet.
It’s imperative to double-check before confirming the removal. Ensure you are ready to delete your Apple Card details. If you’re removing it for security reasons, consider when you will be readding it. If it is to clear your wallet, check if there might be any ongoing transactions needing the card. Before removing your Apple Card from the Buxton wallet, carefully assess your reasons and any potential ongoing transactions to avoid complications or delays in your financial activities.
After confirming the removal, your Apple Card is no longer available for payment. However, your other cards in Apple Wallet remain unaffected. You can continue using them as usual or set a new card as your default for Apple Pay. Ensure you understand the result of this action to prevent any inconvenience.
Confirming the Removal of Your Apple Card
After selecting ‘Remove Card’ in the Apple Wallet app, you will need to confirm the action. A prompt will appear, asking you to confirm the removal of your Apple Card. This is a crucial step, as it prevents accidental deletions. Follow these instructions to ensure your card is safely removed:
- Read the prompt carefully to ensure you are removing the correct card.
- Tap ‘Remove’ to confirm that you want to delete the Apple Card from your wallet.
- Wait for a confirmation message that your Apple Card has been removed.
Keep in mind that this action cannot be undone. Once confirmed, all details and transactions linked to the Apple Card on your iPhone will be permanently deleted. Before tapping ‘Remove,’ double-check that you’ve completed any pending transactions and that you don’t need the card for immediate purchases. By confirming the removal, you are also saying goodbye to the benefits and cashback rewards that come with the card, at least until you re-add it to your wallet.
Now that your Apple Card is removed, you can manage your remaining cards or add new ones to your Apple Wallet. In the next section, we’ll discuss how to handle the remaining cards and ensure your wallet is organized and up to date.
Managing Your Remaining Cards in Apple Wallet
After removing the Apple Card, your Apple Wallet still contains other cards. It’s important to manage these correctly. Here’s how to organize the remaining cards and set a default for Apple Pay:
- Open the Wallet app on your iPhone.
- Swipe through your cards to review what’s left.
- Select a card you want to use frequently.
- Tap on the ‘…’ button to view more options.
- Choose ‘Make Default’ to set it as your primary card for Apple Pay.
By setting a default card, you streamline your payments. Future transactions will use this card unless you choose otherwise.
Next, consider if any cards are outdated or seldom used. Removing unused cards simplifies your wallet. To remove an extra card, follow similar steps as with the Apple Card removal. Tap on the card, choose the ‘…’ button, and select ‘Remove Card’. Confirm when prompted.
Regularly updating and managing your wallet maintains security and convenience. It ensures your transactions reflect your current preferences and needs.
Keep in mind, managing cards in Apple Wallet also includes adding new ones. If you have a new credit or debit card, just tap the ‘+’ icon in the Wallet app. Follow on-screen instructions to add your new card.
By organizing your cards, you keep your digital wallet tidy and functional. It’s a good practice to check your Wallet app periodically for any necessary updates or changes.
What to Do After Removing Your Apple Card
After you remove your Apple Card from your iPhone wallet, consider the next steps. It’s essential to ensure your digital wallet aligns with your current payment preferences. Here are actions to take post-removal:
- Review your default payment option in Apple Wallet. Ensure it’s the card you prefer for transactions.
- Add any new cards you might need for payments. Tap the ‘+’ icon to include them in your wallet.
- Update your Apple Pay settings if necessary. This could be your billing address or contact information.
- Check for updates in the Wallet app. Keeping the app current is vital for security.
- Notify any merchants if you have automatic payments set up. They will need your new card details.
- Consider your budget or financial tracking. Make adjustments as needed since the Apple Card cashback will stop.
By following these steps, you can keep your digital wallet functioning smoothly. Remember to review your payment options and settings regularly. This ensures your transactions are secure and in line with your financial plan.
Securing Your Wallet App Post-Removal
After you remove your Apple Card from your wallet, it’s crucial to secure your Apple Wallet app. Tightening security keeps your financial data safe. Here are easy steps to enhance your Wallet app’s security:
- Update Your Passcode: Ensure your iPhone has a strong passcode. Change it regularly for added security.
- Enable Face ID or Touch ID: Use biometric security for extra protection. This prevents others from accessing your Wallet app.
- Review Card Details: Check the information for remaining cards in your Wallet. Make sure all details are accurate and up-to-date.
- Turn on Find My iPhone: This feature helps if you lose your iPhone. You can remotely lock your Wallet app or erase your iPhone’s data for safety.
- Regularly Monitor Transactions: Keep an eye on your bank statements. Look for unauthorized transactions that may indicate security issues.
- Keep iOS Updated: Always install the latest iOS updates. They often contain important security fixes for your Wallet app.
- Be Cautious with Wi-Fi: Avoid using public Wi-Fi for financial transactions. Use a secure connection whenever you access your Wallet app.
By following these steps, you secure your Apple Wallet app after removing cards. You also ensure your remaining cards are safe for future transactions. Regular checks and updates are the best ways to stay secure.